My Piantor Layout: A 42-Key ZMK Keymap
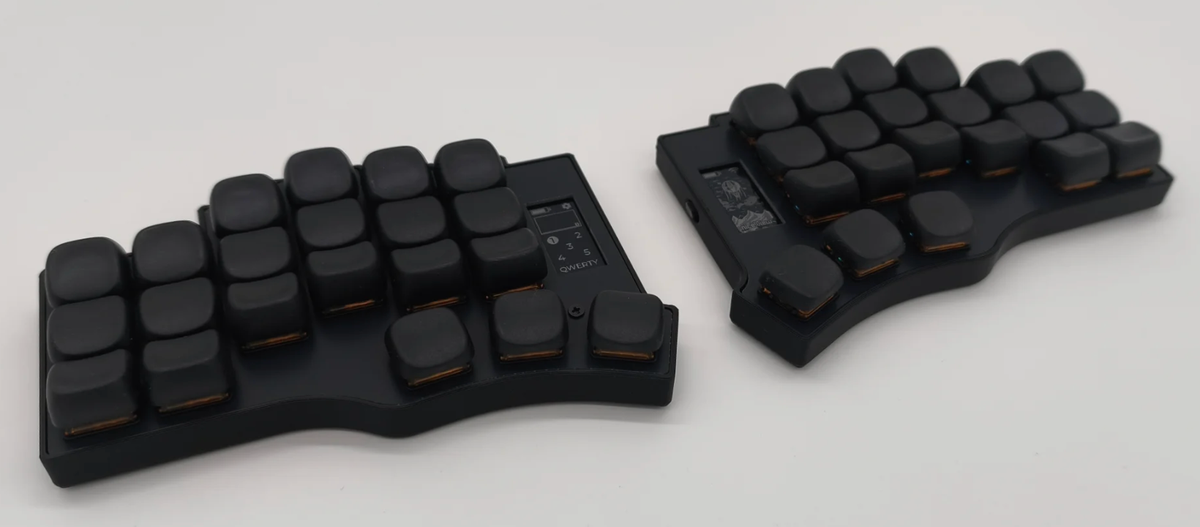
This is the keymap I use every day on my main keyboard. The hardware is a Piantor Pro BT, built by Keebart: a wireless, column-staggered split keyboard with 42 keys in a 3x6 layout, an nRF52840 Bluetooth module, Choc switches, and a low-power display. It runs ZMK, and my configuration is based on Keebart's firmware repository, Keebart/zmk-config.
The switches are Kailh Deep Sea Silent Switches as Alexei from Keebart recommended me as an even nicer alternative to the LowproKB sunset switches I used before.
The keycaps are KLP Lamé Keycaps which might not be for everybody, but i really like them for being ergonomic, easy to press with low force (using the pinkie finger on shift for example, which is very common when writing german texts) and reducing the need for finger travel even a bit more because of the sculpted "saddle" design.
So is this your secondary "hacker toy keyboard" ?
The point of a small split keyboard is not to travel with it or using it as a second keyboard. It is actually my main driver for almost everything. The point is to keep my hands in one place and only move my fingers, but not too much.
The truth is that the standard keyboard layout is heavily bloated. Who needs a space bar which is at least 5 keys wide, when you only touch it at the same spot with the same thumb all the time? Look at your laptop: an even bigger trackpad could fit there! Who needs number keys and function keys available all day long in a single row barely used? Again, look at your laptop: this could be a great place for some great stereo speakers or better ventilation.
Thinking of all these issues a small split keyboard is essentially about improving ergonomics by removing things which are not needed and staggering the columns in a way that matches your fingers. Oh, and yes: having two halves you can freely move around your desk is also a big bonus of course.
I commonly use the split keyboard on the left and right sides of my laptop, which feels very comfortable for me.
Okay, but you also use your own keymap?
Yes! The following walkthrough shows my keymap which is my attempt at optimizing a minimal amount of keys in an ergonomic way, persisting it to my muscle memory and not losing my skills on a regular keyboard layout in the process, because I still need to use regular layouts on smartphones and tablets.
With my personal layout everything is either on the base layer under a finger I already rest there, or one thumb-hold (layer switch) away.
Rather than describing every key, the following images show each of the five layers I have designed for myself. What I want to explain is why they are arranged this way.
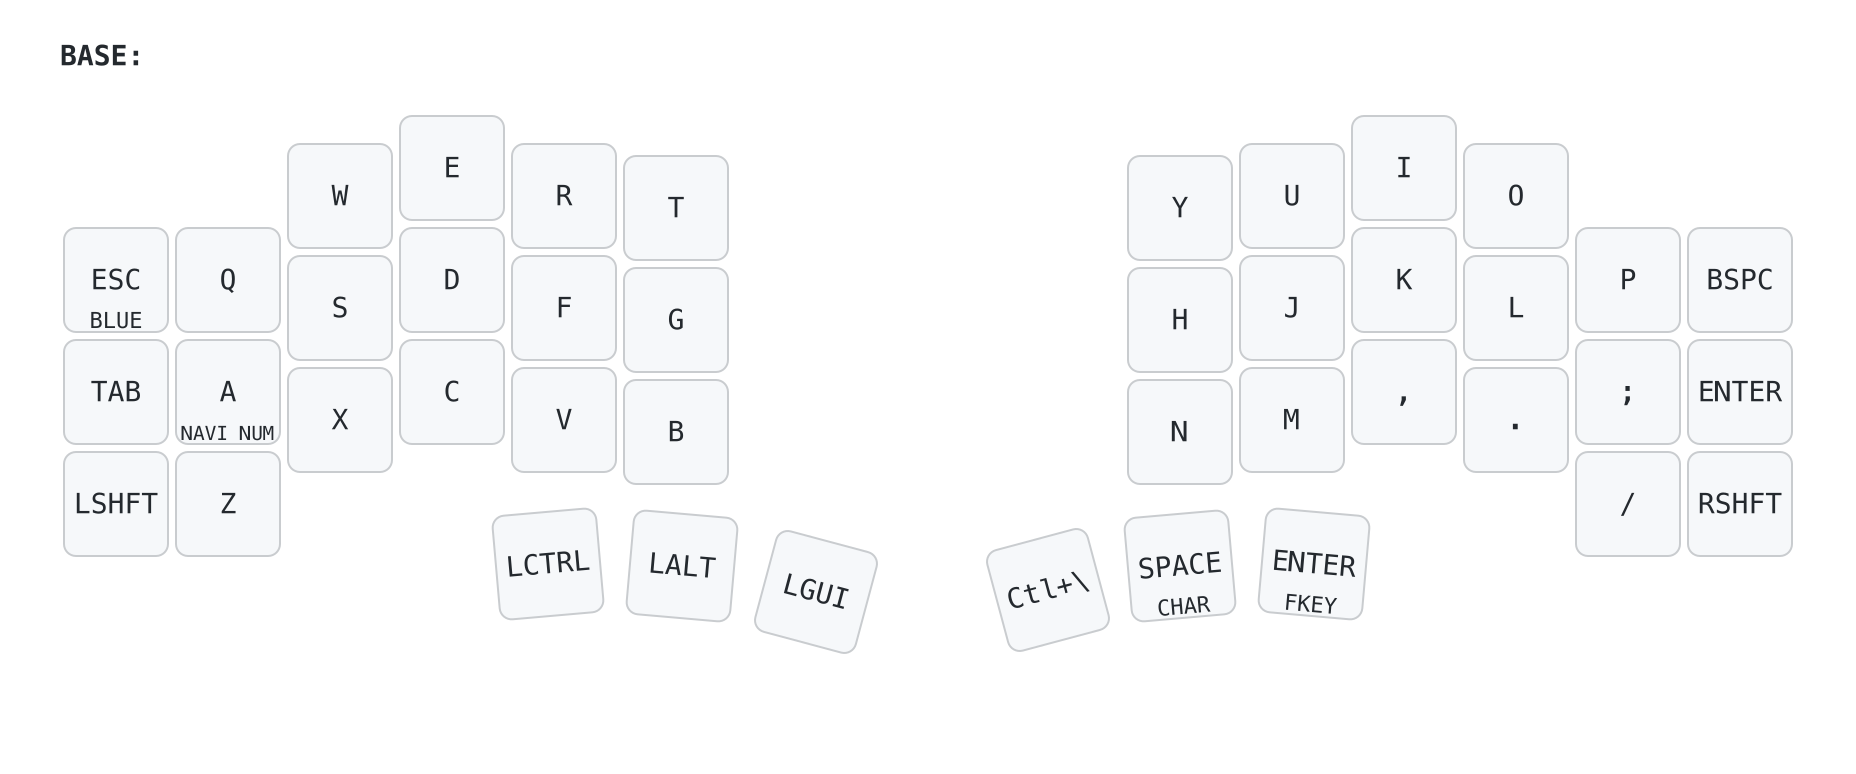
The base layer is plain QWERTY. I did not switch to an alternative letter arrangement, because QWERTY is what my muscle memory already knows and the ergonomic gain from the physical layout of the column-staggered keys is larger than from a (very) different letter order like Colemak or Dvorak. I tried those in the past, but it just didn't work for me.
Where did the modifiers go and how are the other layers activated?
Two home-row keys are layer taps. Esc is a tap for Escape and a hold for the BLUE layer. A is a tap for A and a hold for the NAVI NUM layer. That is all what's special on the base layout. I deliberately did not turn every home-row key from asdf and jkl; into a modifier, which is a common pattern called home row mods. Full home-row modifiers (HRM) overload (up to) eight keys with hold-tap behavior, and on fast same-hand rolls they can misfire: you reach for a letter and get a modifier instead. I tried this at least two times and I was not able to fine-tune the HRMs config to make them actually usable. Two layer taps are enough for me anyways, and they sit under fingers that rarely roll into a conflicting key.
If you are interested: Please go ahead and try HRMs for yourself! In theory, HRMs are a great thing to have.
The only thing i would like to improve is moving the Shift key away from the bottom left and right, because I write a lot of german text and we use Shift a lot. Right now pressing Shift all the time with my weakest finger is mitigated quite well by the KLP Lamé keycaps design, but having Shift as home-row mods on my strong fingers would be nice to have.
Tell me about the thumb keys!
The modifiers live on the thumb keys. The left thumb cluster holds Ctrl, Alt, and Gui as seen on common layouts, just more ergonomic. The right thumb cluster holds Ctrl+\, a Space tap that holds the CHAR layer, and a convenient Enter tap that holds the FKEY layer. Keeping Ctrl, Alt, and Gui on the thumbs means they are always exactly one press away and never compete with a letter for a finger.
The dedicated Ctrl+\ key is a habit from my very heavy terminal use, where it is a common shortcut. I use it to get out of terminal buffers in the neovim text editor. Other people use it to activate the tmux terminal multiplexer (for which i use ctrl+g) - good to have that on a single key.
The hold-taps use a 200 ms tapping term, a 100 ms quick-tap window, and ZMK's balanced flavor. These numbers are tuned so an ordinary fast keypress is always read as a tap, and only a deliberate press-and-hold activates a modifier or a layer.
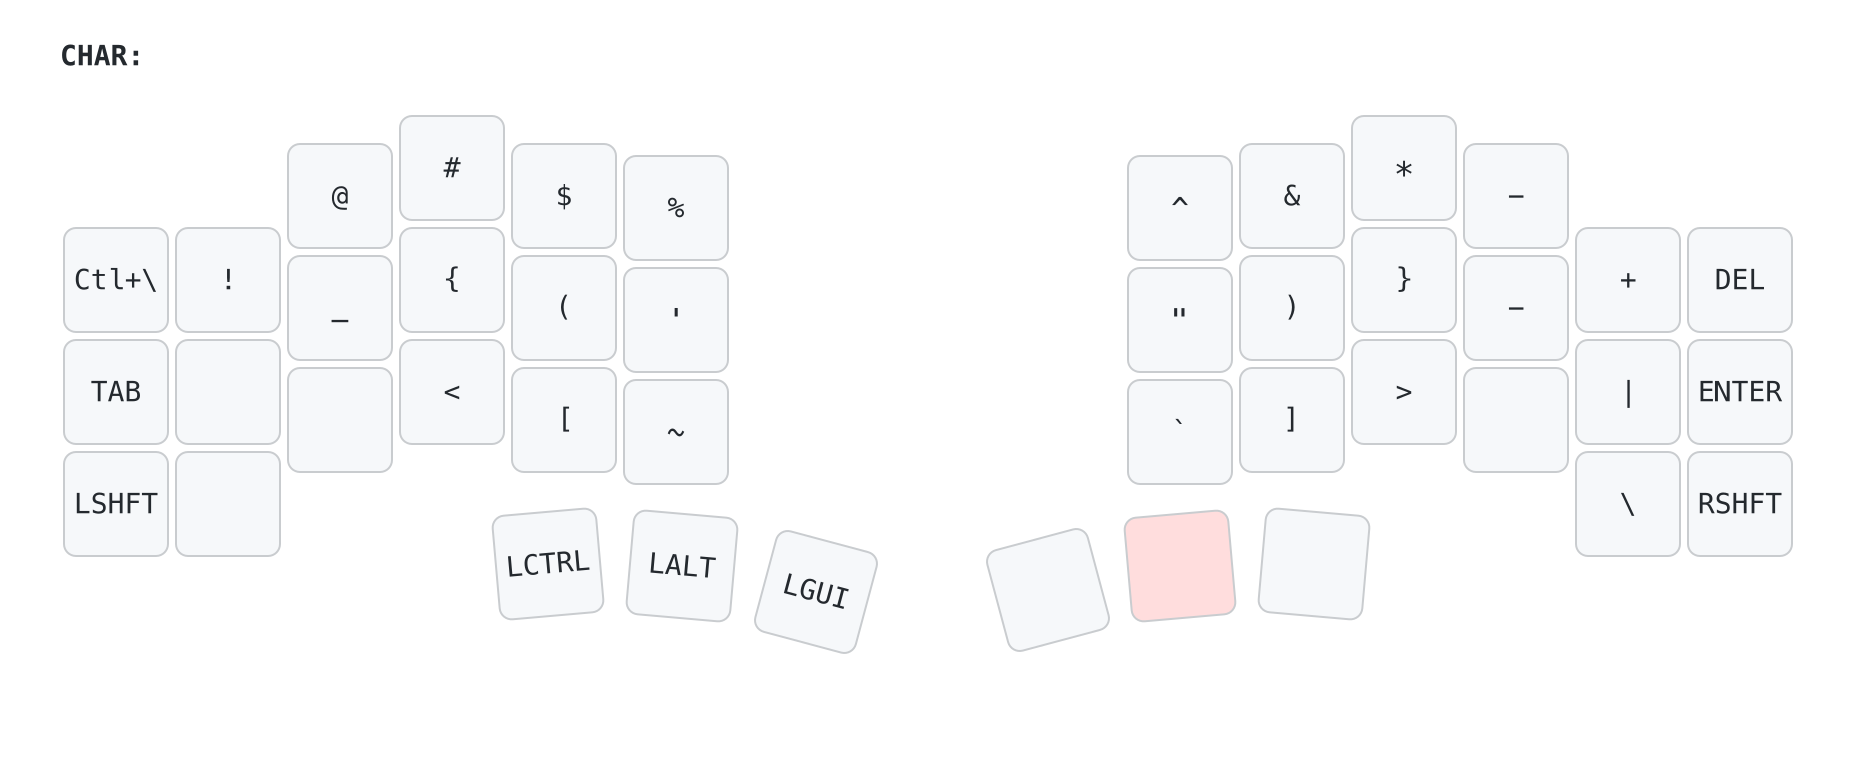
Holding the Space thumb opens the CHAR layer, which holds the symbols I use while writing: !@#$%^&*()-+ on the top row, which is not every elegant but i have that already in my muscle memory from using common keyboard layouts, so i decided to keep them.
Then the next rows on the CHAR layer are carrying _{}()"' and | in the middle, and <>[] and ~\ on the bottom. I grouped the pairs so the opening and closing characters of (), {}, [], and <> are easy to reach as symmetric pairs. This layer also carries Del on the top-right corner and other modifiers for convenience. Symmetry is the key here, while keeping a common top row of symbols just because i know them by heart.
I see you don't have numbers where your symbols are?
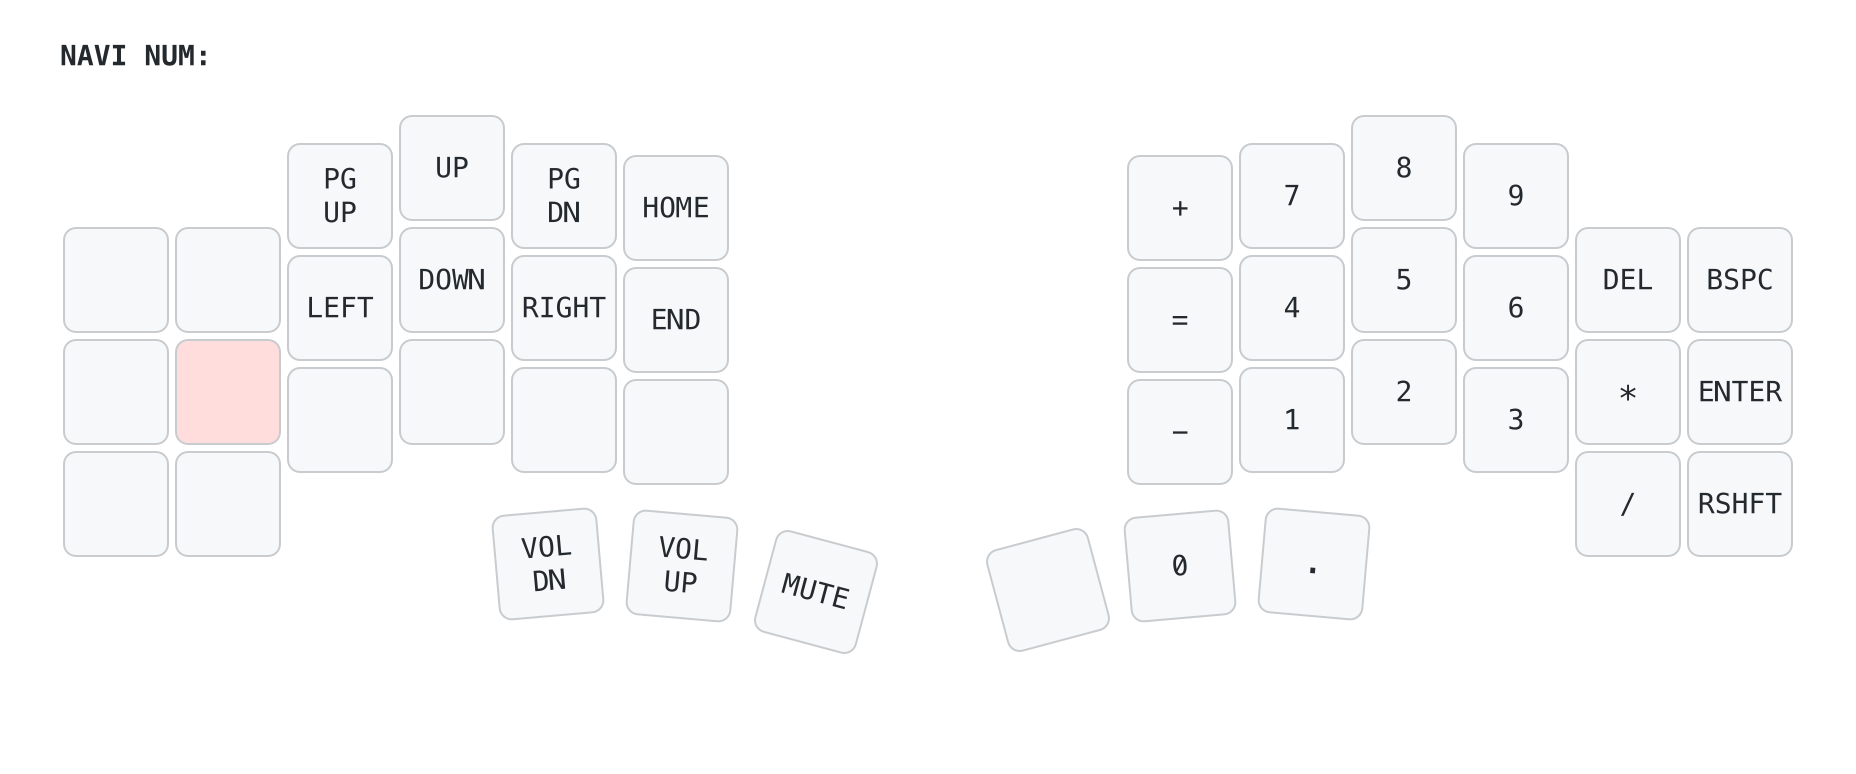
Separating symbols from numbers into the NAVI NUM layer is a deliberate choice. On a 42-key keyboard the digits have to move to their own layer anyway, and mixing shifted symbols into the same layer as the number row makes both harder to remember.
So, holding A opens NAVI NUM, which merges navigation and the number pad into one layer. The left half gets the arrow keys in a proper inverted-T layout plus PgUp, PgDn, Home, and End in a very ergonomic way of just pressing my pinkie and then i get all the comfortable navigation keys without moving my left hand at all.
The right half gets a standard numpad layout with +, -, *, /, and =, and the thumb keys provide the only media keys i use: volume and mute. It is like someone just exchanged the right half of the keyboard with a dedicated numpad without moving my right hand at all.
Combining navigation and numbers in one layer is a space-saving decision. Navigation moves the cursor and numbers type digits. I have never needed both at the same time. The split falls naturally along the hands, too: the left hand navigates while the right hand enters numbers. For relaxing and browsing a webpage with my right hand on the mouse i have my left hand on the navigation layer and can keep browsing/paging/scrolling the web for hours without even moving my left hand at all.
Where are the function keys?
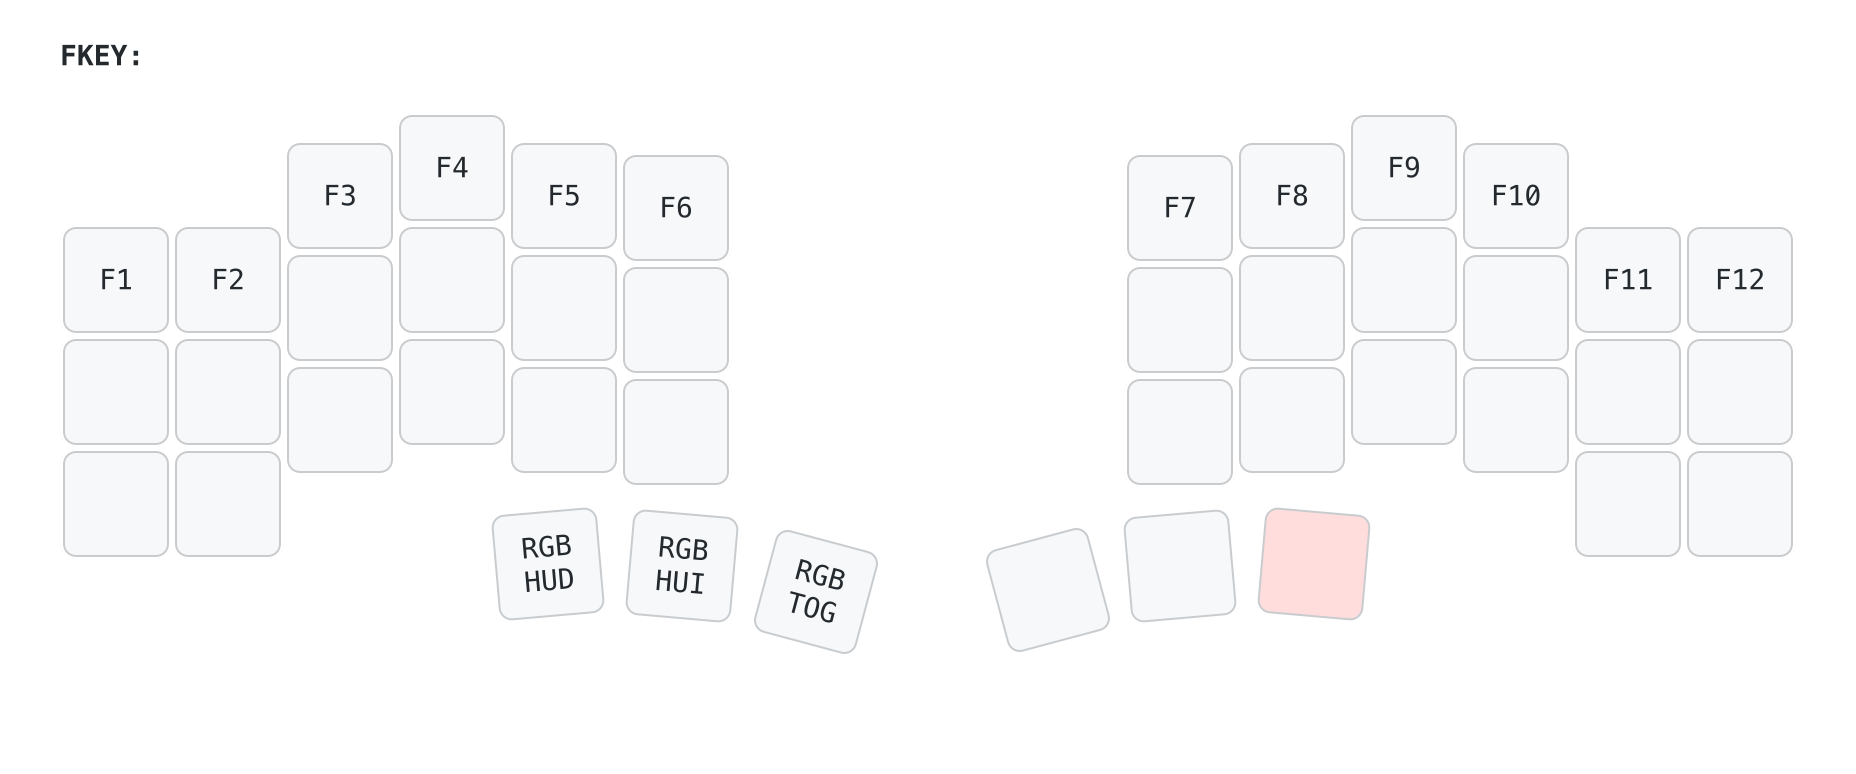
Holding the Enter thumb key switches to the FKEY layer, which has F1 through F12 and the RGB underglow controls on the left thumb keys: hue down, hue up, and toggle. This is the layer I reach for least, which is exactly why it sits on a hold rather than taking up base-layer keys. It is also quite easy to press the correct F-Key because they are so neatly lined up on the two split keyboard halves.
Bluetooth control?
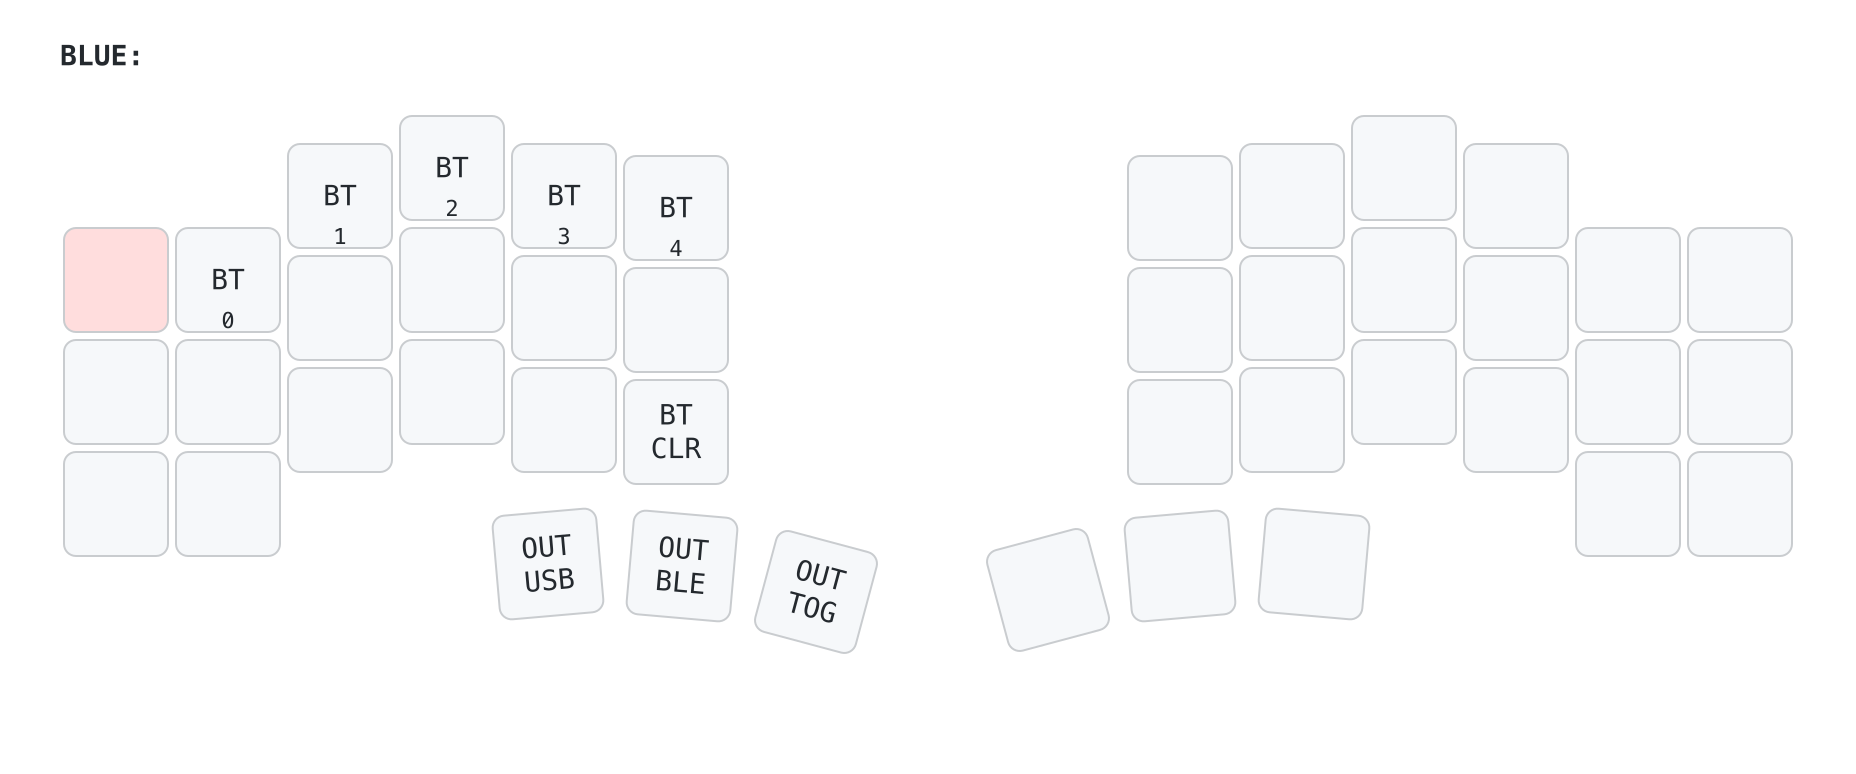
Holding Esc opens BLUE, the layer for the wireless side of the keyboard: Bluetooth profile selection, a key to clear stored pairings, and the output controls to switch between USB and Bluetooth. This is housekeeping rather than typing, so it lives on a hold and stays out of the way. It is also hard to accidentally press Esc and BT 0-4 or any of the other keys which are active on the layer.
Convenience or madness?
Five layers sounds like a lot, but three of them are on a single thumb hold each, and none of them needs the other hand to activate. Also think of normal keyboard layouts you might have learned: Shift, Alt/Option, GUI/Win, and Ctrl and maybe even Numlock and Caps are essentially also layer switches everybody uses. Even on modern smartphones we have layer switching all the time. So it is not that weird as you might think if all this is new to you.
The layer images in this post were generated from the ZMK source keymap with keymap-drawer. The keymap itself is a plain ZMK .keymap file managed in a Git repo.